Showing posts with label Filmy Gyan. Show all posts

Friday, August 28, 2020

Role of Digital Imaging Technician


A Digital Imaging Technician (D.I.T) bridges the gap between principal photography and editorial. 
 
 
What does a D.I.T do?

Designing secure workflow for smooth picture and sound post.
Backup of original camera file from the cards with md5/hashxx64 checksum verification &
spot checking that includes production audio in organised manner.
Onset technical problem solving of issues that may arise, primarily during principal
photography and post-production.
Generate dailies with base grading from the raw rushes for edit with metadata with transcodes.
Create data reports and keep the key members of the unit informed.
On set color management & leveling.

You can look at it as "Chief Technical Officer" (C.T.O) for camera department.

The challenges of D.I.T in Indian scenario.
 
"Most of us are not yet doing live grades but we are getting there. It's the cost."


You plan for outdoor location shoot may be abroad that's when the editor or DOP mentions to hire Digital Imaging Technician to organize, structure and transcode with on set looks on clips if you are using log and flag QC issues on set. Be a second pair of eyes checking for issues that may be bottleneck during post production stage or before leaving the expensive location.

But mostly data wrangler is hired by junior production member or due to budgetary decisions. At the end majorly a data wrangler with an laptop comes to set to primarily copy and paste data with no checksum and QC to verify the copy from capture media cards to hard drive or SSD with only screenshot copied on the drive. At times, I hear one hard drive copy is made and second copy is made later. Resulting data corruption and errors and QC issues being copied onto to the second backup without even visual QC by the time the cards are formatted for reuse. 
 
It's too late but things are changing at snail pace in India for non OTT shoots. The reason camera attendants who also double up as data wangler have another shoot next day so they kind of choose to ignore the process which causes heavy budgetary loss and the content suffers may be because now you have to use alternate take available.

Let's continue with our scenario. In the ninth moment it's now decided that the editor will be joining for the two month schedule. So finally D.I.T is hired because you need some one to add luts and transcode and not "convert!" as I hear in lay persons terms you mean "transcode" right. Hopefully the right person will be hired on the project who uses checksum for the transfer and legal tools for transcodes with right color science and calibrated monitor and configuration with applications and knowledge of post workflow pipeline.

The shoot begins and finally shift ends with key members of the team meeting for the first time on set floors and that's again things may go for toss. When production decides to make the DIT wait after long day end or after night shoot, post pack up till remaining cars are full after two hours three hours wait post pack up is called. Finally a transport cars or grip, light team car arrives and the DIT is finally taken to the far away hotel not without the production running some errands in between while data is still lying with the D.I.T to make the matters worst the hotel is in middle of no where and the DIT has to double up as security. The D.I.T has seen the cattle grazing and a single railway line who is staying outskirts with camera, sound in a hotel filled with cobwebs and bed bugs, home for next few weeks before location shift on most of the projects since it's a series to save few shillings that may have drastic consequences if luck runs out.

Why such a long story well the editor is 3-4 hours away from D.I.T. The editor needs days transcoded proxies including the D.O.P and Director also wanting to see the rushes at highest quality with RAW. May be there are some remaining transcodes that will take time and you have another days of shoot next day. So again you travel back to the "HOD and cast" hotel, reconnecting the drives and the setup for viewing with few hours left to rest. You may not have assistants for upload on review platform even a platform to securely share on cloud based drive. If you are a small fish on a indie project with minimal setup. There is competitive bidding wars that takes place to secure a project going below the minimum market rates which keeps on depreciating. The LTO backup is required if you are following 3-2-1 backup method which means three backups in different mediums and copy offsite. It's risky if it happens later on at the lab many days later of principal photography.
 
You ask, why is this D.I.T working in such conditions may be the person is the assistant and due to competition he has to accept the low pay he is tolerating the fatigue which could be dangerous. Many in India are still unaware of the vital role of the D.I.T who are the custodian of the original camera files till it's handed over to lab as per insurance clauses. When the drive is full it's handed back to the studio or a offsite facility for safe keeping. It only happens if it's mentioned as a requirement on the spec sheets thanks to OTT and big studios. 
 
There is a wrong assumption that the D.I.T only copies and pastes files for backup so why do we have to pay so much? 
There are many who understand the importance these days and get the value of extra pairs of eyes looking out for the unit but still unaware the real purpose which I hope to cover. You will hear, "Even I can do it it's just like copying files from pen drive or phone memory chips (SD)." or "why make the person stay at the fancy hotel? It's only a copy and paste job hitting buttons on the computer to "convert" (transcode) or why should I pay this amount because you are using legal software comparing, apples to oranges.

Now a days you have solutions like transporting the shuttle drives to the editor, cloud services with password protection and apps such as post lab, silverstack lab that could be handy in such situations but the production team needs to provide a separate WIFI connection and not the "hotel WIFI or mobile data" which needs to be recharged due to data cap by Internet service providers (ISP) because of Fair Usage policy (FUP) to share media and sound with the editorial team, in some cases even VFX for temp VFX work to begin.
 
Please take care of your crew. Everyone is important. If you take care of the crew they will take care of your project. Do not class divide with A - B - C crew give the respect and value that they bring to the table.

(Disclaimer - The scenario I am describing is a worst case scenario. It's more or less still the reality to an extent.)

Also take a look into film to digital cinema & workflow. (Link below)
Cinema workflow resources

Saturday, May 2, 2020

Democracy on screen


Nowadays, movies and shows have become more metadata driven. It has replaced decision making from hands of few studio executives, agents, powerful reps, hedge fund managers and brands even independent studios which was based on genre, marketing data of what worked.

The meta data has given the studios a look into user data for emotion graph and devices to give user a better cinematic experience at home and cinema with survey forms.

A good story, always has it’s merits but audience is the decider. What's good on screen and sounds good with the moving images.

The star system is still seems to prosper. Times are slowly changing, who knows what post Covid19 will be like? Since people are now watching alternate cinema around the world. The tastes are changing. It's democracy on screen. You can watch movies in studio quality at your preferred time of day and night.

The biggest blockbusters are releasing in theaters but most of the content is being sold on streaming service. The films cans of movies, documentaries in some vault is now getting digital release.

There were only few handful streaming services but since the numbers are increasing the streaming service or Over the top, "OTT" platforms have become the new cable providers around the world with internet connectivity. 

The OTT's are now the studios, distributors and exhibitors of content. Revenue earned by subscriptions. There is also community driven models where creators are given small cut of the pie if the creators qualify for partners program criteria.

Saturday, January 17, 2015

No more Celtx Desktop

This was the software in which I wrote my student films for my student exercises and many of us used it for commercial and non-commercial projects.

But don't worry. At least, there is a mobile app and online interface still available for free.

There is a new "paid app" Script for Mac for $19.99 only for mac as of 5th Dec, 2014 available from celtx stores via Mac App Store.

Source:
https://support.celtx.com/hc/en-us/search?utf8=%E2%9C%93&query=Is+Celtx+Desktop+software+supported%3F&commit=Search

In case you have celtx project then.
1. Log in to www.celtx.com/
2. Skip the offers or click on the studio tab.
3. You can drag upload the celtx project files or browse in your computer and upload them on their could

You can edit your screen plays, novel, av etc. online through your browser or app which sync's.

For Celtx Desktop for Mac/Win older version:
http://www.facebook.com/l.php?u=http%3A%2F%2Fwww.reddit.com%2Fr%2FScreenwriting%2Fcomments%2F2demqo%2Folder_versions_of_celtx_still_free_for_mac_pc%2F&h=mAQGsrYo8

Tuesday, May 7, 2013

Why digital film looks so milky

A job of a 'Digital Image Technician' is to set and decide workflow to avoid conflicts when dealing with mixed formats from different digital cameras and take secure backups and transcode for the editor to do offline edit before the Digital Intermediate process takes place so that EDL's, XML and the VFX sequences and sound match with the offline edits during the post production process till your content is distributed through Digital Cinema Package (DCP).


A 'Digital Image Technician' is generally from post production background who is a editor who understands the process of pre production to post production and various other aspects of film making which comes handy to guide different departments of a film unit to achieve best from their art and times breaking new grounds which creates a feeling of 'Awe' in the minds of the audience.

The ARRI Alexa camera is a digital tape less camera which records digitally on cards with images up to 3k size which is higher than 1920X1080 pixels HD resolution recorded on Sony F3 and Sony F35 on tapes but latest *Sony F65 is tape less (updated).

On my seventh day as a DIT on location I was asked "Why the SXS Apple Pro Res QuickTime 444 clips looks milky" for which I had no proper answer. I just knew that a LUT (Look Up Table) has to be added to the Apple Pro Res 4444 QT's to make it look like the live video feed from calibrated monitors on set in the post stage while trans-coding as decided with the team.

The older ARRI Alexa camera gives two outputs one in SXS cards in Apple Quick Time 444HQ format with roll numbers as a clip name and .ARI Codex in Gemini card which records .ARI file in folders or in the Codex recorder as a raw proprietary extension like the .dpx sequence is given in form of .ari you can switch on and off the Rec709 looks set by the cinematography department while trancoding a process to makes high res footage for editing to save disk space and easy data management .

The camera records on 24 fps (Also on 25 fps and other fps). The ARRI Alexa camera shows you the live feed REC 709 look that you see on the monitor with no milky image but you can see a milky image in the ARRI Alexa Apple Pro Res 4444 QT MOV on XT or 444 HQ on the SXS cards. Its because the image has additional gamma (brightness) to give more control of colors while doing the color correction so its only the meta data same goes for Red epic (5K) and Red Dragon (6K) (Updated). Its just representation of looks via meta data.

You have to add custom LUT's to make it look like raw live feed on the camera .ARI file sequences while trans-coding with Davici Resolve lite or any other software which accepts LUT's to make the C-log/S-log/red-color look like the way you recorded on ARRI Alexa/Red/F-65/Black Magic Pocket Camera (Updated).

Wednesday, April 24, 2013

THE EVOLUTION OF MODERN INDIAN CINEMA


I spent some time researching the essential innovation that led to today's Indian Film industry into modern age. This was poster is made by Utsab Bandopadhyay. The vector graphics used under fair usage from tabakool/brusheezy.com

Saturday, April 13, 2013

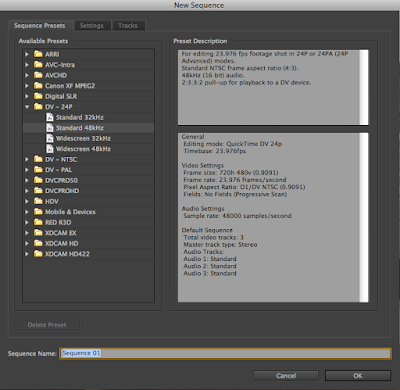
Adobe premiere pro cs6 missing presets sequence fix on mac

Adobe Premiere Pro CS 6 trial version dialog box screen shot
Now a days film and tape based recording formats is being replaced by tape less camera in form of meta data in cameras like Red, Arri Alexa and Canon DSLR's. Even adapting to new formats takes times that's the place I come in resolve frame rate mi-match issues, mixing different formats, XML and EDL offline to online matching during the process of digital intermediate, DVD authoring with multiple language subtitling, DCP (Digital Cinema Package) creation for digital movie projectors. Trust me I am good at it most of the time but sometimes it becomes also a learning process on the job. Actually its more fun than a job. As a editor I enjoy editing films but really hate the rush to complete films but I have to be practical since the producer has paid huge money laying on the film. The film has to be released soon for the movie to earn profits. Its your speed,skills and know how on line to finish the project on time. As a student I trained on Apple Final Cut Pro 7 in film school and learned Adobe Premiere Pro CS3 during my school summer vacations.

So to cut it short.

Apple released Final cut Pro X (Version 10) in the market with new state of the art editing pipeline with interesting new features. Most of them liked it some compared "FCP X" to "I-movie" on steroids catered to armature market. Most of them shifted to Avid Media Composer and Adobe Premiere Pro. But I personally don't think software matters much its the skills I have even edited big projects on Sony Vegas Pro, Windows Movie Maker and even on Nero Vision and got handsomely rewarded. In the end, the editing suite of your choice is just a tool of the profession. Its the picture that matters to the audience.

I too use Final Cut Pro 7 and use Adobe software's like After effects for movie titling and Photoshop. Recently I started using Adobe Premiere Pro CS6 for editing web programs at CND on Apple Macintosh computer and discovered small bugs which got resolved with the Adobe Premiere Pro CS 6.2 update.

After few days I accidentally uninstalled Premiere Pro CS6 from my mac book Pro but I reinstalled the software again to my shock I realized that all the sequence presets went missing in the preset window in Adobe Premiere Pro CS 6.2. So I looked on the net and found about the problem on the mac system so temporary solution was to "drag and drop" the premiere project file on premiere to continue editing since I had deadline. Luckily it worked and I was able to drop it to my clients on time.

Later on I went to the internet and I found out that its a licensing problem for which I have to deactivate my Premiere Pro license but it didn't work even after reinstalling and downloading the newer version of premiere from the internet. Meanwhile, I continued working with this problem and later on I left my job and went independent so I had to return the license to my client.

After a while, I gave up finding answers to why all the default presets sequence went missing on my mac version of Adobe Premiere Pro CS 6 and nothing seemed to work and I did a massive system clean up to solve the problem and tired with a trial version of Adobe Premiere Pro and it worked.

This is the solution which worked for me:

Note: Do it at your own risk. This is a step to clean Adobe program data to fix missing sequence presets to reappear so do not ask for illegal hacks,cracks or keys. You need to have adobe ID.

1. Uninstall Adobe Premiere Pro or the Master Collection.

2. Download 'Adobe Creative Suite Cleaner tool' from the Adobe website.

3. Go to User (or Name) - Documents and delete the folder called "Adobe"
(Its OK if the folder is not there move on to the next step)

4 . Go to 'Application support' and delete "Adobe" folder

5. Again Go to User (or Name) - Library - delete the folder called "Adobe" go inside the folder called Preference Pane inside it delete all com.adobe file also check for com.adobe file in the cache folder.
(Note be careful do not delete any other com. files or folders)

6. Re-install Adobe Premiere Pro. 
Set your serial numbers and preferred language and activate with Adobe.

ALSO TRY: (Updated)
I would recommend you to go to the mac desktop click on any where on the screen. You see finder on top of the apple menu icon on the white bar then press option (alt) -> go to library. Its a hidden folder in the go menu and delete any adobe products. But you do need to have a legal version to get the full adobe premiere cs6 features on your mac.

Hope it works for you :)

Sunday, April 7, 2013

Apple ProApps QuickTime Codecs v1.0.2

#Important Codec Update: ProApps QuickTime Codecs v1.0.2

Image Source: apple.com


http://support.apple.com/kb/dl1396

This update adds the following video codecs for use by QuickTime-based applications:
Apple Intermediate Codec
Apple ProRes
AVC-Intra
DVCPRO HD
HDV
XDCAM HD / EX / HD422
MPEG IMX
Uncompressed 4:2:2
XAVC

This update is recommended for all users of Final Cut Pro X, Motion 5, or Compressor 4.

Saturday, February 2, 2013

Basics of digital camera

This are collection of 3 videos that explain the ISO, F-stop, Depth of field for digital principal photography.

ISO


F-stop


Depth of Field

Wednesday, January 30, 2013

Migrating from FCP 7 to Adobe Premiere Pro


Export 'xml' from 'Final Cut Pro - 7' with version 5 and check the option box to take the outside clips.

Open 'Adobe Premiere Pro' and import the 'xml'  and reconnect the media from the sequence timeline or browser if it's offline. 

Locate the clip in your system or from your hard drive. 

When you are done editing on Premiere you can bring back the rough cut with basic transitions to FCP by exporting a 'fcp xml' in Premiere and import it in fcp from file menu - import.

Thursday, September 6, 2012

Aja Ki Pro the new video assist

It is very expensive to hire video recorders to capture from tape on hourly basis when shooting on HD. The Aja Ki pro is used along with cameras like Sony F-3, F-35  to stamp time code on tape and on the Aja hard drive, which is a tape less medium, which takes in the same time code as the tape which used for offline editing to save time and money to capture and also saves hard disk space. The Aja ki pro therefore acts as modern day video assist. 

Aja Ki Pro used on Gap Diploma Set with Sony F35
The Aja ki pro video has a lower video quality when compared to the tapes because the video is recorded from monitor SDI out cable and through BNC cables, which carries out the digital signals to Aja Ki Pro with time codes. Hence we only make the offline cuts on final cut pro or avid with apple pro res 422 HQ format or lower resolution format. If you plan to record on higher quality or even SQ which can be later connected via Edl’s or xml files in the lab for conforming and color correction on software’s like Nukoda,Resolve or Auto desk Smoke. Even Apple color can be used to connect with raw data or original clips.

The ‘Aja ki Pro’ contains the same time code as the tape. But due to some reasons if they don’t match then it becomes a problem.

This can occur if during filming you unplug the BNC cable which carries the time code information to the recorder or if you set the wrong tc settings. 


Overall Aja key Pro is the best recorder in the market better than Atmos Samurai in my opinion.

Sunday, March 25, 2012

Making Cinema

Cinema is an art. It is just like any other art form like painting, sculpturing, and photography. The only difference between cinema and other art forms is that cinema is a visual medium. It is not like literature or a book. Cinema borrows from all art forms of the world to the screen by incorporating drama.

Cinema in the west can be categorized into genres whereas in the Asian sub-continent a narrative is considered according to the 9 rasas given by Maha Rishimuni in the book Natyashrastra.


There are two types of film forms:

Fiction (Not Real/Imaginative):
Example:
Feature films, Ads, short fiction films

Non-fiction (Real):
Example:
News, events which are real which are documented not acted out are called documentary.

Cinema should never be categorized but now days some consider cinema into categories generally in India:

A. Commercial Cinema
B. Art Cinema

You should consider that cinema is challenging like any other art forms. Art takes its time but there accidents and geniuses. Film making is a different ball game is not home videos on 8mm camera or high definition handy cam it has deadlines, require money and skills if you want to be professional in some aspects of film making. It also requires dedication and lots of practice to be good at it. Every one is not born creative some have to learn to understand there gut feeling it takes time to understand an art subconsciously to develop them. It’s not about good or bad cinema some make it big at first film and some have to make innumerable numbers of tries to succeed.

You can not make films just to be famous. A person has to have an agenda or message to convey to the world. Some of the world’s greatest artists or personalities had a tragedy which made to share the world a story like the Harry potter author J. K Rowling after she lost her close family, her mum when she was young.

There fore,a film maker should find a reason to make films and not go for money or fame.

Also Read:
Film making as a Career
http://utsabnov.blogspot.in/2009/02/talent-matters.html

Thursday, November 24, 2011

Mixing frame rates on timeline

We have moved on from film bath to develop negatives from original camera negatives to digital age where film are being digitized  with 'digital intermediate' by scanning film.

The softwares like Filmlight, Davinci Resolve, Nukoda, Smoke, Luster are used to color correct and grade a film in digital color space on high end computers or even fast laptops "digitally" by a colorist or an editor on NLE's apps. Due to new improvements, frame rates and workflows may confuse a filmmaker.

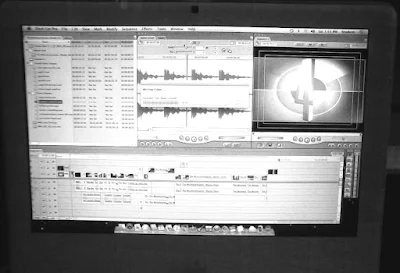
MY FCP 7 TIMELINE DOING MY STUDENT PROJECT

Lets understand how a movie is edited for a film or digital film (video).

How a 'film' is edited:
When we use film the standard playback is 24 frames per second (24) which runs on the camera which exposes light on a negative and a chemical process takes place. Its just series of moving images which is called a frame. A frame is single exposure of image on a negative stored through photo chemical process which is developed as a positive in a lab from the original camera negative (OCN).

If you shoot on 60 fps or 48 fps doesn't matter since a film does not have a timecode. When you edit it optically the 48 fps and 60 fps will run slower when played on 24fps projector for example 'Raging Bull' slow-mo sequence.

But nowadays we convert film into tapes which has timecodes with edgecodes information as reference which tells the editor the physical address of the frames on the negative on 16MM/35MM/65MM negative. This process is called telecine (telekine) in which a editor gets the tape containing the rushes in form of Digibeta, DV tape or HD SR tape with digital logs containing data which the editor edits and later on makes a cut list for the negative cutter/confirmst to cut the film optically from the original negative or  the editor provides xmls or edl's to labs to scan the negative for color correction process (DI) and VFX to produce a married print which contains picture and sound which is stored on negatives, tapes, optical discs or DCP (Digital cinema package) on hard drives for distribution.

How a digital film is edited: 
The digital film is a popular format for shooting movies, television programs or documentaries. The advantage of digital is that its cheap when you want to make changes in offline stage and also because some cameras are light enough to shoot in extreme conditions like Go Pro Hero under water and for guerrilla style filming with DSLR Canon 5D Mark III cameras. C100. They are also new breeds of digital movie camera like Red cameras which is near to film look or grade them like film Even traditional camera makers are developing Arri Alexa and Sony camera pioneering digital cinemas.

Also because you can directly edit the film without going to expensive lab procedures for developing the original negative through telecine process which ends the long waiting process. You can right away start editing your contents after the days shoot on Apple Final Cut Pro, Adobe Premiere or Avid Media Composer.

Even though digital film is fast catching up. It also poses some problem like on some DSLR cameras there is no continuous time codes it only records clip names, date and time of the video clip and the its shot on different cameras on different frame rates.

Digital Cinema:

There two types of digital recording medium
Tape and tape less

a. Tape:
If you shoot your content on DV, HDV, HD-SR tape.

b. Tape less
If you shoot your content on digital then its stored on Hard drives, RED Mag, Codex, Gemini, SxS, SD Memory cards, Optical disk etc.

All the tape less media is called OCF - Original Camera Files.

Mixing clip frame rates

Note: Backup your project first and rushes. This tricks and solutions may or may not work on different softwares but basics are same.

12 FPS to 24 FPS
If you have lesser frame footage. Let’s say 12 fps with dialogue.
Take the footage from media pool or media browser bin and drop it in the timeline.
Give a 24 fps export.

It will be a new OCF clip which you can bring back for offline edit timeline with transcode/proxy. Make sure to match source resolution on Resolve.

23.976  to 24 FPS
If you have 23.976 footage you want 24 fps then change clip attribute/interpret footage to 24fps it will speed the clip a bit. Only if you don’t have a dialogue.

Please also note if you convert the footage then you will make an entire new clip lose the original metadata and clip won't link during conform stage during DI due to the difference. The new clips become the master clip.

Adobe Premiere Pro has 'Interpret Footage' option.

Right click on the clip - Modify - Interpret Footage

Same can be done on Da Vinci Resolve with changing clip attribute in the Media Pool.
and export as individual clips or one single clip.

Updated Final Cut Pro X - You can use re timing to change fps to match project same with Compressor.

100fps/60fps/50fps/48fps to 24 for making slo mo
Same can be done to make slo mo shot let's say when using DSLR. Take 100 fps clip and change attribute to 24 fps.

In Pro cameras you can shoot 100 fps or any other slo mo fps and set project to playback and record as 24 fps to play.

If you have mixed clips 23.976, 25 fps, 30fps
Set the sequence to the lowest fps settings and add other frame rates clips in the timeline and give a ref export for final project frame rate if it's going for DI along with EDL/AAF. Check the sync and frames.

Nowadays in DI software a conformist has an option to handle mixed frame rates and frame sampling, blending or optical flow which is used for slo mo shots. It's better to pre plan and not think of 'Fix it in post'.

Other way is one by one make a standardised clip lets say 24 fps in external software like Resolve or using a different sequence in premiere. By setting a sequence let's say 24 fps and exporting as 24 clips at source res then by dropping it back in the editing NLE timeline sequence as single clip.

It may look like this 23.976 fps clips as 24, 25 clips fps as 24, 30 fps clips as 24 also using it as master original clip for DI.

Generally faced this issue during interviews at a events where the videographer has to constantly change frames for slomo on a DSLR and interview gets recorded at let's say 60 fps. You have to standardise it. I make a 24 fps sequence and export is as 24 and bring to timeline.

Update for proxies:
You can use Da Vinci resolve lite /Studio, Filmlight Daylight, silverstack lab or Adobe Media Encoder even Premiere Pro/Avid/FCP etc. to make low res proxy for offline edit.

If you are still using Final Cut Pro 7:

Cinema tools can also make 50 fps to 25 fps to playback clips as slomo or you can use compressor to re-time.


Monday, October 24, 2011

10 steps to make films on zero budget

1.Shoot something with anything (quality does not matter)
2.Ask your family, friends Dad or Mom even your grand parents for funding or make a ppt and upload your business plans on net to get funds
 
3.Once you get the funding after you beg, steal,borrow get a camera and ask your friends or family to act.
4. Find a editing software and edit it and add some sounds
5. Export it in best possible quality

6.Now Market it! upload it on you tube and other websites 
7.Tag your friends and family and ask them to like and share
8.Note the comments and reviews 
9. Now send it across film festival circuit on DVDs or to friends and circulate it.
10. Make a better film and re edit your previous film for funding.

Congratulations you are a film maker..! :)

Monday, August 29, 2011

Color correction with Apple color


Recently,  I used Apple color for my mise-en-scene exercise at my film school at Whistling Woods International, India for color correction. As a student we were supposed to shoot a long shot and multi-cam with two cameras where two different formats on film and digital which was used on aweek long workshop which was a collaborative exercise with different departments in my film school.

The formats used for the long shot was shot with 16mm arriflex (with 500T 7219 Kodak - 400 foot) on single pref on a collapsible set which could be easily customized to suit the narrative and on day 2 we shot with Sony D50 on DVCAM tapes.

As editor,  I was expected to edit the film shot on 16 mm and the Sony D50 rushes on a 4 day shift in the Edit lab and sound to be designed by my dear friend Rahul B. I was shocked to find that the colors were extremely warm. The lighting had dominant reddish-orangish-yellow look which looked very bad on the Panasonic broadcast monitor. I edited the multi-shot exercise on final cut pro 7 gave it for the sound to my friend Rahul but I didn't feel right to just submit the assignment without proper visuals when as film student who has to show his work to the get jobs in future commercial projects.

Few months ago as a student of editing specialization in film school.  We learned to use apple color by my professor Vivian Sir and few months ago we also had learned to use 3 way color corrector on final cut pro from David Hover's editing workshop. To get the optimum visual quality I sent my video to apple color via round tripping and corrected the black and whites of the luminance and the selected portions of highly lit areas on the frames affected due to lighting exposure issues. First few hours was difficult as I was not familiar with the color software as we didn't give a seriousness to it but as the project progressed I was able to master apple color with tracking and manipulating the selected areas of frame with secondaries on apple color after doing the color correction by setting the hue, saturation of the shadows (Blacks) and highlights (whites). I was even able to remove the camera markers recorded on the frame accidentally on one of the clips. 

Only bug this software has is that I had to make new files to save color files to make sure that a new render files was to created with all the preferences of the render settings in the project set prior to the creation of apple file color project or sending it from final cut pro to apple color. The other bug is the codec preset and the pixel size always changes to NTSC setting so I had to do again and again reset the project setting of the color project file from original format to apple pro-res and back and then back to original format may be it has been fixed in the newer version. 

Apple color is a best starter tool as a editor and colorist which gives you basic touch up features on your frames for films and television and even for low budget film makers which even lets you highlight a specific character on screen to enhance narrative with the vignette.

Sunday, July 11, 2010

TV Tuner hiccups Solution

Check if the Tv Tuner card is compatible with your pc or mac when you buy.

Check out that if your usb input is properly connected with the usb hub in your computer.

Check if you have installed the driver software correctly.

*Always read the Manual before installing*

Thursday, June 24, 2010

A good film editing setup

Updated : 15/01/2015

The computers are becoming faster and better. Its possible yo edit feature films and color grade on a laptop due to popularization of digital cinema.

This is the basic requirement:

Processors:
Intel Core i7 processor
Ram:
8 GB to 16 GB or 32 GB may be more
Hard Disk Space:
Minimum recommended hard disk would be 500 GB to 1 TB or 2 TB (Tera byte) or more.

The higher the better with that use software like carbon copy cloner for automated backup on external hard drives to keep daily backups.

A good Monitor :
1920x1080 or higher (2k or 4k support) on your mac/windows display or simply use a external broadcast monitor to see the right colors of the clip you are editing.

Audio:
2 pc speakers is good for video editing setup. 5.1 Setup/7.1 or a good PC speakers + Sub woofer with sound card will do unless you are composing music or sound editing.
Graphics Card:
Nvidea + Black magic card (Used for monitor outputs and connecting recorder decks to your MAC/PC)
Other equipments:
Optical Mouse + Special Editing Keyboard + DVD or Sony Blu-ray Optical Drive

And you need to have basic cables like Esata, Fire wire 400 and 800, HDMI or VGA convertors, Thunderbolt cables etc.

The right Internet speeds:
Some where between 512kbps to 2 mbps speed (ADSL or Broadband) will be good with Wifi which has to be password protected and special upload plans.

Optional:
All in One Printer and Scanner + Screen Tablet Pen (Used for Animation or Graphic Designers) + Tv Tuner Card with recording

Friday, May 21, 2010

Mp4 deleting solution Windows OS

If you are unable to delete the mp4 format files then you can try out the following steps.

This problem is caused by software collision.


Step 1
Restart your Computer and check that if you are able to delete the mp4 file


Step 2
Restart your computer and quickly press F8 key and select "reboot" option with the arrow keys

Step 3
Press ctrl + alt + del or right click on the task bar
Now, Select Task Manager
Go to "Processes" tab
Select "Explorer.exe"
Right click on it and click on end process
(***Make sure you don't close the task manager if have done it then press ctrl + alt + del key and restart your computer*** )

Now, click on file on the menu
New task (Run)
type explorer.exe
and click OK

You will now able to delete the mp4 file

But the permanent fix is to re install the operating system or uninstall the conflicting software affecting the codec.

Saturday, June 13, 2009

The twin effect with crop filter


This crop effect can be used to put together a video of a subject to give conservation effect or for double or twin cloned brother in one frame.

Basically to achieve this effect we first need a tripod camera or a steady surface where the camera can be set steady and it should be well inclined to the surface.

To achieve this effect you have to remember that the timing is the factor. You have to time with left side video and with right side video well.

Now take a camera use tripod or keep the camera in a steady surface make sure you don’t move it.

Now take a video shot where the actor or your subject is in left side speaking its dialog in the frame then pause it. Assuming there some one else in front of him make sure you don’t move the camera.

Again take the second shot where the subject is in right side of the frame as he speaks the dialogs to actor of left side.

Now we need to edit the video in editing software.

The software to achieve the crop effect you have to use the following multilayer video editing software or any other which supports multilayer:

Adobe Premier Pro
Sony Vegas Pro
Ulead
Avid Express

Apple/Mac Users
Apple Final Cut Pro
Apple I Movie

Now open any multilayer video editing suite.

On the first layer add video taken on the left side in the frame.

On the second layer add the right side video in the frame.

Now the magic of editing begins

Select the first video in the layer one [left side speaking its dialog in the frame]

Now, from the effect menu or galleries select the crop effect

Now go to effect settings or properties and crop the video

There crop the video from right side but keep half of the videos of the left side with help of video filters/effects filter

Again give the crop effect to second video [right side speaking its dialog in the frame]

Do the same but here crop from left side and keep the half of the video of the right side

Now preview the video you see the double role of your subject

Only thing you have do is to either give pause when one finishes dialog then the other speaks.

In simple we are basically we are dividing the frames of the video just like the chroma effect.

Also Read: Chroma effect

Monday, June 8, 2009

The effect of continuity in video editing

This post will explain you the process of editing the video by giving the videos the feel of continuity.This info. will be helpful to you if you are new to a advanced video editing software, if you are new to editing or you want to know the trick which will give you a upper hand.

1] Import the raw video in the editing software.

2] Arrange the videos in sequences in the time line.

3] Now give some video Transitions effects in between the two video in the time line layer.

[This above steps will give the videos a continuity effect of the videos taken from multi-cam (Videos taken from various angles with more than 1 camera)]

4] Then add some video effects [VFX] or do some color correction, cropping and stuff.

5] Now export the video in the video format in the lowest quality coz we are going edit the audio so that it sync's properly with video during a transition from video "a" to "b" if this process is not done then the videos may look jerky unless you are using a background track in the entire video.

6] Now use some sound editing software's like Sony sound forge, etc. and correct the audio during video transition by giving cross fade and various other effects as required.

7] Now detach the video layer with the audio layer and export the audio and open the video editing software that you are using .In the editing layer mute the audio of the videos. Then add the new audio in the audio layer which you have corrected in the in the sound editing software and check if its sync's with the video and then export the video.

This above process that I have explained will give the effect of continuity.

P.S: Always remember the 180 degree rule don't cross the axis and maintain the right look of the character in the frame.

Enjoy!

For more info. visit ma blog and read the old posts.
utsabnov.blogspot.com

Friday, May 15, 2009

Who in is an editor

Film editing is a creative and technical part of the post-production process of filmmaking. The term is derived from the traditional process of working with film, but increasingly involves the use of digital technology.

The film editor works with the raw footage, selecting shots and combining them into sequences to create a finished motion picture. Film editing is described as an art or skill, the only art that is unique to cinema, separating filmmaking from other art forms that preceded it, although there are close parallels to the editing process in other art forms such as poetry and novel writing. Film editing is often referred to as the "invisible art" because when it is well-practiced, the viewer can become so engaged that he or she is not aware of the editor's work.
 - Wikipedia


Comedies, for example, require a specific type of timing. Editors must estimate how long audiences will laugh at each gag line or situation in order to space scenes so that one funny incident is not lost in the laughter of the previous one.

Film and Video Editors perform the following tasks to complete a film:

• Evaluate and select scenes in terms of dramatic and entertainment value and story continuity.

• Trim film segments to specified lengths and reassemble segments in sequence that presents story with maximum effect.

• Use editing equipment to insert music, dialogue, and sound effects.

• Review assembled film or edited videotape on screen or monitor and make corrections.

• Work with Sound Effects Editors and Music Editors.

Latest Post

Gigabyte GC Titan Ridge detection issue fix

Buying Titan Ridge Thunderbolt 3 PCIe Card Component I bought Gigabyte GC-Titan Ridge 2.0 (Titan Ridge Thunderbolt 3 PCIe Card Component) in...