Saturday, February 4, 2012

Ways to edit Itunes information in mac os

Some DVD's or Audio CD's may not have embedded information of the singer composer, album and track etc. on the cd due to which the files are named as untitled and unnamed album.

Note:
The I-tunes makes a duplicate backup of music imported. so I tunes makes two copies of the song. If you delete the song from I tunes the files kept in the original files remains. It affects the I tune library only. (If you import from cd's then there will be only i tune file.)


Steps to follow:
Insert the CD
Open I tunes
import the tracks (songs)

Once its synced

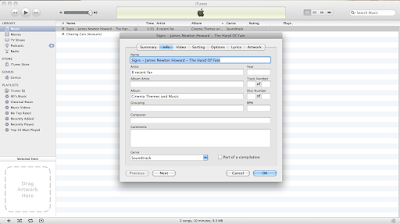
Now, Right click on the song/track
Click on "Get Info" tab

Change the required information and click on "OK"

Now to be on a safer side to keep a backup of all the information.

Select all the songs and back it up on a separate folder by drag and drop method or via selecting the songs in the library by copying via right clicking and pasting on to the folder.

Thursday, December 29, 2011

Mission: Impossible: 4 Ghost Protocol


Recently I saw the movie Mission Impossible 4 at Prasad I max in Hyderabad, Andhra Pradesh during my vacations from my film school during my term break. I must say I am not that great fan of mission impossible series but the movie bowled my eyes with extreme graphics of sandstorm and journey from USA to Russia of course with love to the streets of Mumbai my home town.

The one line premise of the film is " A story of a man who wants lead a regular life despite his dangerous job as a spy"  

The jump by agent Ethan a spy of IMF a fiction spy agency backed by the USA played by Tom Cruise was nail biting to see him jump off Burj Kalifa, a posh seven star hotel in Abhu Dhabi, UAE. Watching it on 70mm screen is heart stopping and very cool experience too watch. But being a film student and a editing student it does clinch to my eyes which won't bug a average audiences is to notice it in I-max screens is a shifting of the image aspect ratios to give the chills to the audience when showcasing the huge Arial shots. The cinematography by Robert Elswit is brilliant and eye pleasing.

The editing of the film is very smooth to the eyes and well cut but the pace and the rhythm does come down when the actors mainly speak about their past lives but the editor Paul Hirsch recovers and compensates with action cuts sequences in the film.  

The movie also showcases the characters entering the Kremlin as bogus military Russian officers and bombings that create tensions in short the movie is similar all previous majority of Hollywood spy movies which are set in political backdrops in pressure cooker situations.

Even though we see a special appearance of Anil Kapoor from Oscar nominated winning film fame of Slum Dog Millionaire who is showcased as a rich billionaire holding the keys to stop the USA and Russia nuclear destruction as some terrorist organization try to take control on satellites to launch missiles with the stolen launch codes when Ethan and his team try to stop them anonymously as they conduct unapproved state operations after the death of the IMF chief after he is being killed. 

Overall the music and the editing and direction of Brad Bird and the usage of prop does give the audience a edge that it does not test the intellect and also has small humor that can be easily understood. This movie should be definitely not missed.

Thursday, November 24, 2011

Mixing frame rates on timeline

We have moved on from film bath to develop negatives from original camera negatives to digital age where film are being digitized  with 'digital intermediate' by scanning film.

The softwares like Filmlight, Davinci Resolve, Nukoda, Smoke, Luster are used to color correct and grade a film in digital color space on high end computers or even fast laptops "digitally" by a colorist or an editor on NLE's apps. Due to new improvements, frame rates and workflows may confuse a filmmaker.
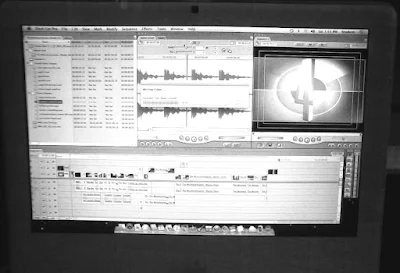
MY FCP 7 TIMELINE DOING MY STUDENT PROJECT

Lets understand how a movie is edited for a film or digital film (video).

How a 'film' is edited:
When we use film the standard playback is 24 frames per second (24) which runs on the camera which exposes light on a negative and a chemical process takes place. Its just series of moving images which is called a frame. A frame is single exposure of image on a negative stored through photo chemical process which is developed as a positive in a lab from the original camera negative (OCN).

If you shoot on 60 fps or 48 fps doesn't matter since a film does not have a timecode. When you edit it optically the 48 fps and 60 fps will run slower when played on 24fps projector for example 'Raging Bull' slow-mo sequence.

But nowadays we convert film into tapes which has timecodes with edgecodes information as reference which tells the editor the physical address of the frames on the negative on 16MM/35MM/65MM negative. This process is called telecine (telekine) in which a editor gets the tape containing the rushes in form of Digibeta, DV tape or HD SR tape with digital logs containing data which the editor edits and later on makes a cut list for the negative cutter/confirmst to cut the film optically from the original negative or  the editor provides xmls or edl's to labs to scan the negative for color correction process (DI) and VFX to produce a married print which contains picture and sound which is stored on negatives, tapes, optical discs or DCP (Digital cinema package) on hard drives for distribution.

How a digital film is edited: 
The digital film is a popular format for shooting movies, television programs or documentaries. The advantage of digital is that its cheap when you want to make changes in offline stage and also because some cameras are light enough to shoot in extreme conditions like Go Pro Hero under water and for guerrilla style filming with DSLR Canon 5D Mark III cameras. C100. They are also new breeds of digital movie camera like Red cameras which is near to film look or grade them like film Even traditional camera makers are developing Arri Alexa and Sony camera pioneering digital cinemas.

Also because you can directly edit the film without going to expensive lab procedures for developing the original negative through telecine process which ends the long waiting process. You can right away start editing your contents after the days shoot on Apple Final Cut Pro, Adobe Premiere or Avid Media Composer.

Even though digital film is fast catching up. It also poses some problem like on some DSLR cameras there is no continuous time codes it only records clip names, date and time of the video clip and the its shot on different cameras on different frame rates.

Digital Cinema:

There two types of digital recording medium
Tape and tape less

a. Tape:
If you shoot your content on DV, HDV, HD-SR tape.

b. Tape less
If you shoot your content on digital then its stored on Hard drives, RED Mag, Codex, Gemini, SxS, SD Memory cards, Optical disk etc.

All the tape less media is called OCF - Original Camera Files.

Mixing clip frame rates

Note: Backup your project first and rushes. This tricks and solutions may or may not work on different softwares but basics are same.

12 FPS to 24 FPS
If you have lesser frame footage. Let’s say 12 fps with dialogue.
Take the footage from media pool or media browser bin and drop it in the timeline.
Give a 24 fps export.

It will be a new OCF clip which you can bring back for offline edit timeline with transcode/proxy. Make sure to match source resolution on Resolve.

23.976  to 24 FPS
If you have 23.976 footage you want 24 fps then change clip attribute/interpret footage to 24fps it will speed the clip a bit. Only if you don’t have a dialogue.

Please also note if you convert the footage then you will make an entire new clip lose the original metadata and clip won't link during conform stage during DI due to the difference. The new clips become the master clip.

Adobe Premiere Pro has 'Interpret Footage' option.

Right click on the clip - Modify - Interpret Footage

Same can be done on Da Vinci Resolve with changing clip attribute in the Media Pool.
and export as individual clips or one single clip.

Updated Final Cut Pro X - You can use re timing to change fps to match project same with Compressor.

100fps/60fps/50fps/48fps to 24 for making slo mo
Same can be done to make slo mo shot let's say when using DSLR. Take 100 fps clip and change attribute to 24 fps.

In Pro cameras you can shoot 100 fps or any other slo mo fps and set project to playback and record as 24 fps to play.

If you have mixed clips 23.976, 25 fps, 30fps
Set the sequence to the lowest fps settings and add other frame rates clips in the timeline and give a ref export for final project frame rate if it's going for DI along with EDL/AAF. Check the sync and frames.

Nowadays in DI software a conformist has an option to handle mixed frame rates and frame sampling, blending or optical flow which is used for slo mo shots. It's better to pre plan and not think of 'Fix it in post'.

Other way is one by one make a standardised clip lets say 24 fps in external software like Resolve or using a different sequence in premiere. By setting a sequence let's say 24 fps and exporting as 24 clips at source res then by dropping it back in the editing NLE timeline sequence as single clip.

It may look like this 23.976 fps clips as 24, 25 clips fps as 24, 30 fps clips as 24 also using it as master original clip for DI.

Generally faced this issue during interviews at a events where the videographer has to constantly change frames for slomo on a DSLR and interview gets recorded at let's say 60 fps. You have to standardise it. I make a 24 fps sequence and export is as 24 and bring to timeline.

Update for proxies:
You can use Da Vinci resolve lite /Studio, Filmlight Daylight, silverstack lab or Adobe Media Encoder even Premiere Pro/Avid/FCP etc. to make low res proxy for offline edit.
If you are still using Final Cut Pro 7:

Cinema tools can also make 50 fps to 25 fps to playback clips as slomo or you can use compressor to re-time.


Monday, October 24, 2011

10 steps to make films on zero budget

1.Shoot something with anything (quality does not matter)
2.Ask your family, friends Dad or Mom even your grand parents for funding or make a ppt and upload your business plans on net to get funds
 
3.Once you get the funding after you beg, steal,borrow get a camera and ask your friends or family to act.
4. Find a editing software and edit it and add some sounds
5. Export it in best possible quality

6.Now Market it! upload it on you tube and other websites 
7.Tag your friends and family and ask them to like and share
8.Note the comments and reviews 
9. Now send it across film festival circuit on DVDs or to friends and circulate it.
10. Make a better film and re edit your previous film for funding.

Congratulations you are a film maker..! :)

Thursday, October 6, 2011

R.I.P Steve


"Stay Hungry, Stay foolish" - Steve Paul Jobs (Founder of Apple and Pixar)

Monday, August 29, 2011

Color correction with Apple color


Recently,  I used Apple color for my mise-en-scene exercise at my film school at Whistling Woods International, India for color correction. As a student we were supposed to shoot a long shot and multi-cam with two cameras where two different formats on film and digital which was used on aweek long workshop which was a collaborative exercise with different departments in my film school.

The formats used for the long shot was shot with 16mm arriflex (with 500T 7219 Kodak - 400 foot) on single pref on a collapsible set which could be easily customized to suit the narrative and on day 2 we shot with Sony D50 on DVCAM tapes.

As editor,  I was expected to edit the film shot on 16 mm and the Sony D50 rushes on a 4 day shift in the Edit lab and sound to be designed by my dear friend Rahul B. I was shocked to find that the colors were extremely warm. The lighting had dominant reddish-orangish-yellow look which looked very bad on the Panasonic broadcast monitor. I edited the multi-shot exercise on final cut pro 7 gave it for the sound to my friend Rahul but I didn't feel right to just submit the assignment without proper visuals when as film student who has to show his work to the get jobs in future commercial projects.

Few months ago as a student of editing specialization in film school.  We learned to use apple color by my professor Vivian Sir and few months ago we also had learned to use 3 way color corrector on final cut pro from David Hover's editing workshop. To get the optimum visual quality I sent my video to apple color via round tripping and corrected the black and whites of the luminance and the selected portions of highly lit areas on the frames affected due to lighting exposure issues. First few hours was difficult as I was not familiar with the color software as we didn't give a seriousness to it but as the project progressed I was able to master apple color with tracking and manipulating the selected areas of frame with secondaries on apple color after doing the color correction by setting the hue, saturation of the shadows (Blacks) and highlights (whites). I was even able to remove the camera markers recorded on the frame accidentally on one of the clips. 

Only bug this software has is that I had to make new files to save color files to make sure that a new render files was to created with all the preferences of the render settings in the project set prior to the creation of apple file color project or sending it from final cut pro to apple color. The other bug is the codec preset and the pixel size always changes to NTSC setting so I had to do again and again reset the project setting of the color project file from original format to apple pro-res and back and then back to original format may be it has been fixed in the newer version. 

Apple color is a best starter tool as a editor and colorist which gives you basic touch up features on your frames for films and television and even for low budget film makers which even lets you highlight a specific character on screen to enhance narrative with the vignette.

Saturday, April 16, 2011

External hard drive fix in mac or to format

The solution to fix your external hard drive in mac are as follow:

Formatting:
1.Make a backup of your data on a windows pc/mac. 


2. Format your drive with mac disk utility tool in Macintosh hd ->applications -> utilities -> disk utility. 

Now, select your hard drive and go to erase tab and select "Erase" and format it to your required file format system.

Self eject solution:
If you have problems with your external hard drives ejecting itself after few seconds which only gets fixed when you restart then make sure when you are running your hard drive on mac. 


Make sure you have unchecked "Put the hard disk(s) to sleep when possible" in the battery tab. (Make sure you recheck it after you done by ejecting your HDD)

Other Solutions:
1.Check the Finder's -> Preferences and General (Tab) -> put a check mark in "External disks" (on the desktop)

2. Go to Macintosh hd ->applications -> utilities -> disk utility if you see your your external hard drive. Then the drive is not dead.

Select the drive and unmount it so the external hard drive will disapear from desktop and side bar. 

Now to get it back the HDD drive on side bar and desktop select mount. But make sure to "EJECT" it before disconnecting.

If you still have problem please take it to a apple mac store or hard drive manufacturer service center.

If mac store doesn't help put the hard drive in a zipped locked air tight bag for 2-3 days and try copying the files by connecting it to your computer you may be able retrieve some data. 

You can also try using the NTFS3G (Free version) software if you are using a dos formatted hard drive to copy files from a mac to windows file formatted hard drive but it would still may give hiccups if you are copying files above 4 gb.

Bonus:
 You use Macdrive software to read and write mac formatted hard drives to be read on windows just like any ordinary pen drive. 

You can also use a 'HFS Explorer' which is a free read only software to read mac formatted hard drives on pc and also cdr and dmg files on windows. 

Latest Post

Gigabyte GC Titan Ridge detection issue fix

Buying Titan Ridge Thunderbolt 3 PCIe Card Component I bought Gigabyte GC-Titan Ridge 2.0 (Titan Ridge Thunderbolt 3 PCIe Card Component) in...